A PDF on first post and pix and info here.
Sometimes easier than a PDF.
Text from PDF.
Jamma LCD Sunburn fix + Cycle Grafix How to remove speedo + link to Jim-Eye PDF remove speedo with pix.
I finally got around to fixing my odometer / tripmeter fogging. People keep saying you have to buy a whole new unit, but I'm cheap, and then your mileage is off I bought the polarizing film off eBay. It was for a gameboy, but any film for a cell phone, corvette, etc will probably work. Just make...

www.vtxoa.com
Pix and Text by jamma Senior Member 28may2016 >>Thank You Jamma .... PDF compiled by Hans
Polarized filter on odo replacement
I finally got around to fixing my odometer / tripmeter fogging. People keep saying you have to buy a whole new unit, but
I'm cheap, and then your mileage is off
I bought the polarizing film off eBay. It was for a gameboy, but any film for a cell phone, corvette, etc will probably
work. Just make sure that it has self adhesive. Again, I bought the cheap one, so it probably won't last as long, but I will
cover the ODO while the scoot is parked at work.
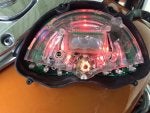
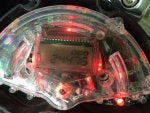
I started by removing the unit and stripping it down half way. You don't have to remove the back. Here it is plugged in.
You can see the offending film.
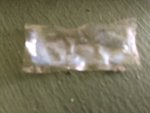
Here's a pic of the film once I peeled it off. Fog city!
Once I got the film, there was still glue had to be removed. I tried a plastic scraper and finger nails, but a soft rag and iso
alcohol did the trick. Took longer to get the glue off than any of the rest of the repair. Couldn't get a clear pic of the glue
(like the pic with the film is clear, lol).
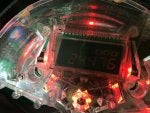
Next pic is of the cleaned odo plugged back in. Can't barely make out the numbers
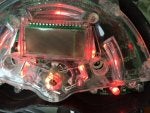
I set the filter over the display, to make sure it oriented properly. This first pic ain't
Next pic is of the cleaned odo plugged back in. Can't barely make out the numbers.
I set the filter over the display, to make sure it oriented properly. This first pic ain't.
The next pic is turned 90 degrees. Correct, and very readable.
CYCLE GRAFIX Senior Member Join Date: Oct 2009
Location: Mount Pleasant Pa. (not far from Pittsburgh)
1. Remove the gas cap. 2. Remove the bottom three screws, closest to the seat from the speedometer housing. 3. Unplug the wire plugs connected to the speedometer housing. (located near the front cylinder on the air cleaner side of the bike. 4. Take out the 4 screws under the housing, this will...
www.vtxoa.com
1300 Speedo LED and Faceplate swap
1. Remove the gas cap.
2. Remove the bottom three screws, closest to the seat from the speedometer housing.
3. Unplug the wire plugs connected to the speedometer housing. (located near the front cylinder on the air cleaner
side of the bike.
4. Take out the 4 screws under the housing, this will remove the housing from the speedometer.
5. Remove the 4 screws from the speedometer, this will allow you to take the clear cover from the speedometer.
6. Carefully remove the needle, If it cannot be removed by hand you can use a fork gently working the speedometer
needle off the pin.
7. Take the 2 screws from the faceplate.
8. The faceplate should now come off.
9. Put the new faceplate on.
10. Now work from no. 7 to no. 1 to reinstall. When reinstalling the needle, put the needle pointing down towards the
tank at an angle. The back side of the needs should point to 101 mph. After the needle is on, move it to the left over
the needle stop. This allows the needle to be in the proper position. Kudo's given to Dave from Fire and Ice for
figuring this out.
VTXOA Step by Step 1300 section has the above text and links to removing the speedo also.
1. Remove the gas cap. 2. Remove the bottom three screws, closest to the seat from the speedometer housing. 3. Unplug the wire plugs connected to the speedometer housing. (located near the front cylinder on the air cleaner side of the bike. 4. Take out the 4 screws under the housing, this will...
www.vtxoa.com
Also speedo backlight modifications PDF with info/pix by Jim-Eye which includes instructions and pictures of
Speedo unit removal.
I downloaded the file 30may2016.
I want to Thank Jamma, Cycle Grafix and Jim-Eye for sharing their knowledge.
Hans
-----------------------------------------------------------------------------------------------------
Additional info July 2018 from Gator44 Junior Member Join Date: Jul 2018 Posts: 1
They can be repaired with a bit of patience. My 2006 VTX has seen lots of sunny miles on florida roads and the
lcd odometer suffered the same symptoms as mentioned. Mine had gotten so bad it was completely black. I
priced the options available, and decided to try the simplistic fix (also the cheapest). Carefully removing the
odometer housing etc, I disassembled the unit until i had access to the lcd. The polorized film had already
curled at its edges and appeared bubbled. Very carefully i lifted on those raised edges until they gave(they were
"crispy"), all this left attached was a section in the very center roughly 1/4" in diameter. The problem was it was
just as hard as the edges and the original adhesive was firmly attached. I took GOO GONE and applied it
sparingly to a Q-tip, brushing it over the "affected" area until there was a visible coating hoping to loosen the
adhesive. I let It set for about 15 minutes before attempting its removal, to no avail. Knowing I needed
something to speed up the process I brought in an old pistol type hair dryer set to high and applied max heat to
the lcd /goo gone/polorized film combo. After approx. 1 minute of heating it i found a small plastic wedge to
use as a scraper and began working on the edges, to my surprise it came off in pieces leaving the lcd intact.
YEA!
Long story short, I purchase the replacement polorized film for an I-phone from walmart for $6.00, cut a piece
the size of the lcd, peeled the protective layer off and applied it. I now have a visible odometer again......for
$6.00